apple butter with rum burnt sugar sauce and vanilla
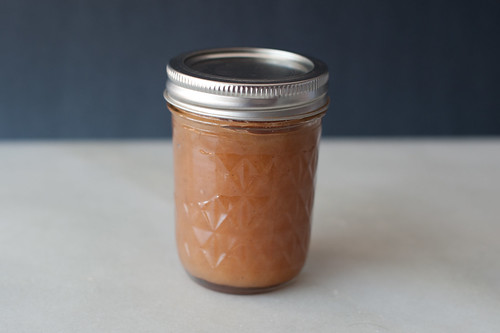
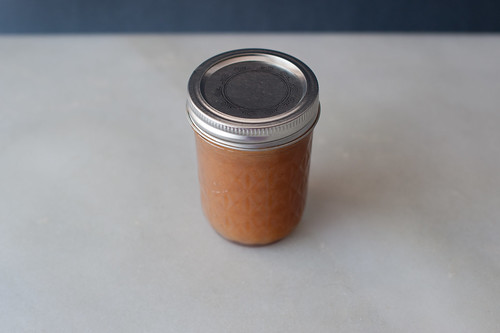
This is not what I’d call a great picture of apple butter. Far from it. I hope you can forgive me – I’m a little pressed for time these days.
I’ve got about six whole meals to make and freeze this weekend. There’ll be veal ricotta meatballs (thank you, Marco Canora!), tamarind turkey meatballs (recipe soon!), a three-bean stew, some chili, chana masala, tomato sauce with onion and butter, and slow-cooked chicken soup. All will be made and frozen for early to mid-October.
Why October? Well, on October 2, I’m getting surgery on my wrist to remove a benign (but extremely painful) ganglion cyst, and won’t be able to cook for a couple of weeks. It’ll be interesting to type one-handed too. Who knows, maybe while wearing a cast, I’ll learn a few one-handed dishes while in the kitchen. If that happens, you’ll be the first ones to know about them—it’s a useful thing to know how to do. I refuse to surrender to the lure (and ease) of take-out as our only dinner option—I want to see if it can be easily done, and if so, maybe it’ll be helpful to someone reading this blog who might be anticipating surgery or a period of time when they won’t be able to cook. And, truthfully, after a hot, sticky summer when I lived on salads and smoothies, I’m itching to put my slow-cooker back to work. So while it would probably work in my favor to offer you more enticing pictures, I’m winging it this time.
I don’t remember anyone making apple butter in Russia, but I distinctly remember eating it. It was called “pavidlo” and it something I could eat with abandon if only I was allowed limitless sweets. I’m pretty sure, although the details seem a bit fuzzy, but my grandmother would even buy me a pastry that was, essentially, a millefeuille with layers of apple butter in between. It was glazed with apple simple syrup and the whole thing tasted divine.
After we moved to the United States, I first tasted apple butter without knowing what it was. I knew I liked apples and I knew I liked butter, and I thought (with my limited English) that it was a combination of the two (also sounds good, right?). But as soon as I tasted it, I was transported back to Russia, the bakery that made the millefeuille, and my tiny kitchen where I’d slather the povidlo over the heel of fresh, white bread. Without a doubt, apple butter and I were going to be friends.
Apple butter is basically a sexy version of applesauce that has been cooked down to the color of milk chocolate (though mine came out slightly lighter this time – more like caramel) and then used as the most glorious topping for yogurt, toast, or just eaten off a spoon, plain. If you consider what happens to a pile of slowly sautéed onions, the heap of golden brown glory that a humble, biting root vegetable becomes after an extended period and some low and slow heat, just imagine, for a second, what happens when applesauce cooks down to a thick, concentrated paste. Do I have your attention now?
I decided that I wanted to give my apple butter a little bit more oopmh by swapping in a burnt caramel sauce in place of regular sugar. I wanted the darker, burnt, smoky taste to subtly punctuate the apples. And while I was so tempted to spike the whole thing with bourbon, in the end, rum turned out to be a better, more aromatic spirit for the job. Feeling generous and decadent, I threw in half a vanilla bean with its seeds scraped out and, truthfully, I think it was the best decision, hands-down, I have made all week, maybe even all month. Once my vanilla bean did its job, I rinsed it out and tucked it into my bottle of Madagascar vanilla extract, something I do often to intensify the vanilla flavor that’s already there. And then I made my frozen dinner menu for October and wrote up a grocery list.
And in case spreading apple butter over a piece of toast fails to excite you, I’m contemplating using it in lieu of apple sauce in this applesauce cake with caramel glaze. Because nothing bad can come out of this.
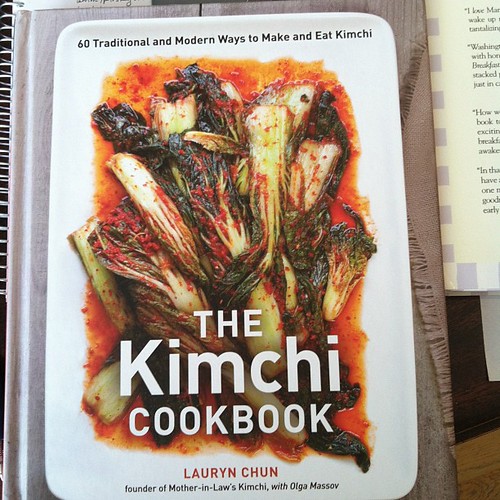
P.S. Look what came in the mail last night!! It feels so surreal to hold this book in my hands! Lauryn and I spent so much time and effort putting it together and hope that you all love it as much as we do! I’m hoping that it’ll make kimchi-making less intimidating, and that it will show case kimchi as more than just a condiment for tacos! While the book comes out November 27th, you can pre-order it here.
Apple Butter with Rum Burnt Sugar Sauce and Vanilla
Burnt Sugar Sauce was inspired by this recipe but I changed the proportions and swapped in rum for bourbon
I’ve been meaning to make this for two years now. I made it once while I lived in Chelsea and borrowed my food mill from a generous neighbor. But I didn’t use the Rum Burnt Sugar Sauce and I didn’t can it. It sat in my fridge and I slathered it on toast every morning with my tea. It made for a glorious breakfast all through the fall.
I’ve been canning for awhile now, and I have to say that it is pretty scary getting into it because there’s all this equipment and moving pieces and before you know it, you just say, “Forget it!” But I promise you if you give canning a go, you’ll pick it up in no time, and it is strangely meditative and relaxing, not to mention canning your own food makes for some great gifts.
A lot of the tips I include with the canning came to me at a very opportune time with this video of Melissa Clark and Cathy Barrow canning in Melissa’s kitchen. Cathy is a smart, experienced canner, full of friendly, unintimidating advice. For example, if you lack canning tongs, don’t run out to buy them. Just slip a few rubberbands over the grippy part of the tongs and voila – you get some slip-proof tongs which you can use to transport your jars to and from the water bath. Another great tip: use the water from the saucepot where you sterilize the lids and rings to add to the hot water bath if you happen to come up a bit short. And my favorite tip of all, when the jars emerse from the hot water bath, do not tip them over to get rid of the water that has pooled on top of the lid. The jar first has to seal (you’ll hear a pop) before you can do that, otherwise you risk getting food stuck between the lid and the lip of the jar – and there goes all your hard work!
3 pounds mixed apples (such as Mackintosh, Cortland, Macoun)
3/4 cup (150 grams) granulated sugar
1/4 cup (59 ml) hot water
1/4 cup (59 ml) rum
1/2 vanilla bean, split lengthwise with the seeds scraped out
1 tablespoon (15 ml) fresh lemon juice
1/2 teaspoon ground cinnamon
Pinch freshly ground nutmeg
Pinch freshly ground cloves
Pinch kosher salt
Start Cooking the Apples:
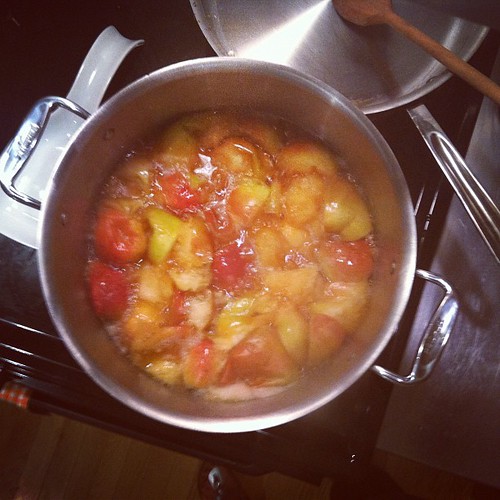
1. In a large pot, combine the apples with 2 cups of water. Bring to a boil and cook over high heat until the have collapsed and are falling apart, about 30 minutes.[While the apples cook, you will make the Burnt Sugar Rum Syrup and add it to the apples.]
Make the Rum Burnt Sugar Syrup:
2. As soon as you place your apples and water on the stovetop, make the Rum Burnt Sugar Syrup. In a large skillet set over medium high heat, melt the sugar until it is the color of an Irish setter (thanks, Melissa, for such a great descriptor). Remove the skillet from the heat, and carefully add the hot water (stand back as the caramel may sizzle and spit), stirring until the water and caramel are dissolved. Return the skillet to the stovetop and set over medium-high heat. Add the rum and let the syrup simmer for 2 minutes. Transfer the syrup to the pot with the apples and the water and stir to combine. Add the vanilla bean seeds and the bean itself and continue to cook until the 30 minutes are up and the apples have collapsed and are falling apart.
Return to the Apples:
3. Run the soft apples through a food mill fitted with the finest mesh. The food mill will remove the skin and the seeds. You should get about 5 cups of apple puree.
4. Return the puree to the pot and add the lemon juice, cinnamon, nutmeg, cloves and salt. Simmer over very low heat, stirring oven to prevent scorching on the bottom. The puree will make quiet gurgling noises from time to time as it comes to a lazy simmer. Cook the apples until the apple butter is thick and jammy and is a color of milk chocolate or a tad lighter.
Prepare Your Jars:
5. While your apple butter is cooking, set a large pot (an 8-quart stockpot is ideal) filled 2/3 of the way with water over high heat and bring it to a boil. Sterilize your canning jars (you can do this on a quick wash cycle in your dish washer or you can boil your jars for 10 minutes.) Fill a medium saucepot with water and bring to a lazy simmer. When ready to can, drop the lids and the rings into the simmering water in the saucepan for about 10 minutes. This allows the rubber part of the lid to become soft, so it better adheres to the lip of the jar.
Canning and Hot Water Bath:
6. Fill the jars with the apple butter (I like to use a canning funnel) and leave 1/2-inch of headspace above. Headspace is the space between the canning lid and the contents of the jar. Thoroughly wipe the lip of the jar so absolutely no food remains on it. Place a lid on top of the jar and screw the canning ring over the jar. Do not screw the ring on too tightly; just make it taught. Repeat with the remaining jars until no more apple butter remains. Place a canning rack at the bottom of the stockpot, or if you’re me, use a silicone trivet. Using either canning tongs, or regular tongs that have a rubber band wrapped around each tip of the tong arms (prevents slipping), transfer the jars to your stockpot with simmering water and bring the water to a boil. If there’s not enough water in the stockpot, use the remaining water from the saucepan to fill the rest of the pot up. Let the jars boil in the water for 10 minutes; then remove and set aside. Important: while you wait for your jars to seal (i.e. you will hear a pop), do not tip the jars to pour off the whatever water remains on top of the lid. Wait for the jar to seal (pop) before doing that otherwise you risk getting the food between the lid and the lip of the jar which undermines your whole canning effort.
9. Once the jars have sealed, label them with the contents and the date and store for up to 1 year.
Makes 4 cups of apple butter. If you get 1/2-cup canning jars, you can get 8 cans of apple butter, which make for excellent gifts come the holiday season!
Brian @ A Thought For Food
Oh how good this looks! I’ve never actually made apple butter, but once in a while someone gives it to us as a gift and we devour it in one sitting. And with rum and burnt sugar, I think it’d go even faster.
Sorry you have to have surgery. BOO! I hope the recovery is quick.
Congrats again on the book! Can’t wait to get my hands on it!
phi
I love apple butter and I have a huge bag of apples – these things happen when you date a jewish boy who loves potato latkes. Thanks for the lovely recipe & good luck on your surgery.
Mariah
Deb- I’m getting wrist surgery in November and would absolutely love more one-handed recipes! I’ve been making tons of your za’atar roasted cauliflower.
Radish
Mariah – message received. Will do a whole post on pre-surgery kitchen prep and recipes! What is your surgery for?
Jennifer
Just wanted to say that I had surgery to remove a ganglion cyst a few years ago. Good for you for planning ahead! The surgery itself was not painful, but the recovery was slower (and unfortunately, more painful) than I had anticipated – so clear your calendar and plan to spend a few days lolling around in bed – preferably being tended to by your loved ones! GL and Happy New Year!
Radish
Jennifer – thanks for the heads up! I’m not a good patient! Any chance I’ll be able to go running those few days to work off my frustration? :) Also, are you back to doing all your normal things and no issues with the cyst right?
Barbara | Creative Culinary
I’m making jelly and apple sauce today. Wine jelly and…well, I was going to do bourbon apple sauce; wish we could compare!
Hope your recovery is quick and you’re back in the kitchen with two hands before you know it.
Maggie
This looks delicious! The perfect thing to make with all of the apples that are so abundant in Maine right now.
I hope you have a speedy recovery! I had an infected cyst lanced and then removed from my shoulder over the summer. The whole process took seven weeks, but the recovery from the removal surgery only took two. I am not a good patient and had a very hard time slowing down and taking the time I needed to heal. Hope your surgery goes well and that you are back in the kitchen quickly!
It's Not You, it's Brie
I’ve yet to find an apple butter recipe that’s caught my eye like this one, so thanks for sharing. I’m imaging it topping an almond meal tart base and pastry cream.
Wishing you the best in your surgery.
Hannah
Divine, absolutely divine! I really need to get a food mill. Congrats on your book! I can’t wait til it arrives.
You are smart to be planning ahead for your surgery. I had a ganglion cyst removed from my right hand (and, of course, I’m right handed!) about 15 years ago. The recovery was definitely a process and I made pathetic attempts to use my left hand for cooking and household tasks…better to relax and read! My doctor told me these used to be called Bible cysts because the common treatment was to whack it with a Bible to rupture the cyst. Whew, I’ll take the surgery, thank you. Wishing you all the best!
sonya
olga,
i, too, had a ganglion (which i referred to as the ‘cyst on my wrist’) removed, but it was when i was a child and the details of the recovery are hazy. i will say that i’ve never had any issues w/ my wrist since it was removed. hoping your recovery is swift and relatively pain-free.
this apple butter looks divine and might get me to take the leap to *finally* start canning. as well as purchase a much yearned-for food mill. (any recommendations on a brand?)
happy new year!
Radish
sonya – that’s funny because i call it “the cyst on my wrist” too – it sounds like a nursery rhyme, doesn’t it? Hooray for canning. Do let me know how it goes! It really is a little scary the first time around and then you realize just what a no-big-deal it is. As for the foodmill, there are many great brands out there: some expensive and some are affordable. The one I use and love (and it’s very reasonably priced) is a brand by OXO – it’s easy to put together and clean and has nice “grippy” things on it so that it doesn’t slide around much while you’re milling.
sonya
yes, “cyst on a wrist” does indeed sound like a nursery rhyme (or a dr. seuss line)! thanks for the heads up – i think i’ve heard good things about the oxo food mill before. for sure, i will let you know how it goes!
Jennifer
Re: your recovery. I’m pretty sure I went back to the gym in the week after surgery, but used a drugstore purchased sling to keep my wrist more or less still while I exercised. My guess is that for the first week or so you will not be comfortable running because of the jouncing and bouncing. Plan on long walks instead. No problems with the cyst in the years since my surgery. ( I had had it lanced/drained previously and it had reappeared.) I do have a small scar and a little depression where the cyst used to bulge out, but no pain whatsoever in my wrists. I practice yoga, so pain in the wrists would be a real bummer! You’ll be fine – and glad to have it over with!!!
friday link love | Sassy Radish
[…] my surgery, Luisa was reading at the Powerhouse Arena. I raced there just to say hello and give her this and sadly, couldn’t stay for the reading since I had just learned I had to waked up at 4am […]