thanksgiving turkey 101
Making a Thanksgiving turkey doesn’t have to be a difficult event—or a stressful one. Today, my job is to try to take the scary out of the turkey for you. Believe me, the method I will offer you is far more hands-off than something your mother or grandmother has practiced and I’ll explain why it might be better.
I won’t tell you that this is the only method of making a turkey—that’s akin to saying there’s only one way to fry an egg or roast a chicken. But this has been the method that has consistently worked best for me. Also, I find the science behind cooking to be incredibly fascinating. Ask me about latkes, and I’ll manage to talk about them for an hour-though you might be asleep.
My turkey method is adapted from Alton Brown. Years ago, while in college, I used to religiously watch his show, Good Eats. If you were the kind of person who always wanted to know what chemical reactions were taking place when you were cooking, this was a show for you. I don’t remember when I first came across his theories on cooking a turkey, but I found it to sate my curiosity and the best part — it totally worked for me. Since then, Brown’s treatise on Thanksgiving turkeys has appeared in a few places–and no wonder: Thanksgiving turkey is the cornerstone of the entire holiday meal.
Sam Sifton, in his latest book, Thanksgiving: How to Cook It Well, states that the centerpiece of your meal is the turkey. It’s the whole point. And your goal as a chef is to get a moist, flavorful, nicely-browned bird to the table. I couldn’t agree more.
Consider the Turkey:
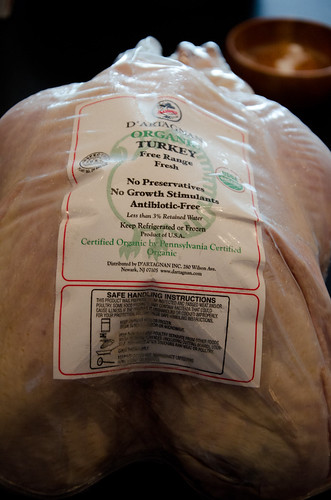
Turkeys tend to run on the dry side, so they need a little trickery to prevent them from emerging dry from your oven. Start with the best turkey you can find and afford—a quality turkey will yield a tastier roasted bird. If you can’t get a heritage breed, try to find an organic or free range one, or an antibiotic/hormone free turkey. A kosher turkey, if you prefer one, will already be seasoned (and pre-brined) so if you like to brine your turkey (recipe at the very bottom), it’ll save you a step. Because the turkey runs on the dry side, you will need to cook it in two stages: first, you will brown the skin and then you will cook the meat until the turkey is ready. By the way, that pop-up timer that a lot of turkeys come with? Throw it away—or don’t pay any attention to it. By the time that pop-up time pops, your turkey will be as dry as pressed wood chips, which aren’t appetizing at all.
Ideally, to get your turkey just right, you will invest in a probe thermometer (this one has served me well!) that will allow you to monitor the turkey temperature from the outside of the oven and keep that oven door closed. Opening the oven door, lowers the oven temperature and thus will increase your cooking time. As if they turkey doesn’t already take long enough.
Fresh vs Frozen:
I prefer to get fresh turkeys, but they can be a little hard to come by at times. A frozen turkey will serve you just fine – be sure to allow for adequate thawing time. You can thaw your turkey in the fridge if you have space, or you can stick it in a 5-gallon cooler and let it thaw in cold water and ice (place a large gallon-sized bag of water on top of the turkey) and keep switching the cold water and fresh ice every few hours to keep it cool and fresh.
To Brine Or Not To Brine:
I touched upon it a bit a few paragraphs above, but here’s more on the topic. Brining is a great technique: it makes the bird more flavorful and moist. However, for those of us who live in small apartments, brining poses a logistical issue – where do we find a container large enough to fit a large turkey and where do we store it in between the holidays or what else would we use it for? A good workaround on not brining yourself is to get a kosher turkey, which comes already, pre-brined (though go easier on seasoning your kosher turkey since it’ll already be saltier). You might find the pan drippings to be too salty to make the gravy (when you’re done cooking the bird). You can dilute those drippings with enough water, broth, and/or wine until it tastes right to you and reduce until your gravy is of the consistency acceptable to you. When you’re done brining (if you brine), rinse the turkey under cold, running water, and thoroughly pat it dry with paper towels.
If you choose not to brine and you don’t want to get a kosher turkey, here is how I have gone about seasoning the bird. Thoroughly pat the turkey dry with paper towels making sure to get in all the crevices. Liberally rub it with kosher salt (preferably Diamond Crystal) – start with about 2 tablespoons and see if it needs a bit more. Depending on the size of your turkey you might need more or less. But for a 4-pound chicken I use about 2 teaspoons. A 12-pound bird will need about 6 teaspoons, which works out to be 2 tablespoons. Place the turkey on a shallow baking pan and refrigerate it, uncovered, for 2 days. I realize this requires you to free up a lot of space in your refrigerator and this might not be an option. All, I say is that do the best you can. If you can rearrange your fridge contents for 2 days or buy fewer groceries those 2 days, you will be richly rewarded with a beautifully seasoned bird. Honestly, I can’t recommend it enough.
Two-Step Cooking:
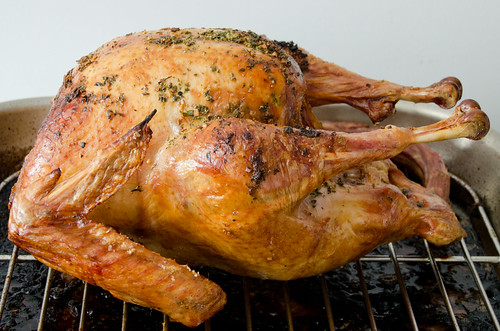
In cooking the turkey, you want it to be beautifully browned, with gorgeous, crispy skin; and you want it to be moist and flavorful.
Alton Brown recommends that you first blast your turkey at 500 degrees F for 30 minutes to get the skin nicely browned. The reason you do that first is so that the fat doesn’t just melt away, through the slower-cooking process, and wind up at the bottom of the pan. Then you cover the breast with a breastplate made out of foil, and roast the turkey at 350 degrees until the internal breast temperature hits 161 degrees. Why 161 degrees F? We prefer our white meat at 161 degrees while our dark meat at 180 degrees. To get there, you need to cook the white meat slower than the dark meat, so they cook at the same time, but the white meat cooks at a lower temperature. To do that, you make a foil triangle (fold over a large foil piece), slightly oil/butter it, and then place it pointy side to the turkey opening (other corners on the sides of the turkey) oiled side down.
And that is it! No basting, no opening the oven door, no stuffing. You just let that turkey sit while you busy yourself with other dishes (or take a pre-Thanksgiving nap).
No Basting/No Stuffing:
Why no basting, you might wonder? After all, most recipes will tell you to baste. But according to Brown’s explanation (and it makes great sense here), basting is akin to dipping yourself in the pool while getting a suntan. You will burn faster that way because the water will act like a prism, and basting, in actuality, dries out your turkey, not to mention having to open the oven door, means letting the hot air out and the cold air in, which in turn lowers the temperature of the oven and slows down the overall cooking time.
Why no stuffing? Well, as the bird cooks, it gets drier and drier, but stuffing the turkey with stuffing, you slow down its cooking time and thus are running the risk of getting a much drier turkey on your plate. You can warm up the stuffing while the turkey waits to be carved-that’s a much better solution. You can put some aromatics in the turkey cavity: garlic, herbs, lemon, onion, etc, and they will perfume the turkey with their essence. But stuffing—hold off.
The Magic Number:
The temperature at which you pull your turkey out of the oven is 161 degrees F. Because by the time white meat is at that temperature, the dark meat will be around 180 degrees – which is ideal. The best and easiest way to get to that number is to use a probe thermometer, which consists of a probe that connects to a digital base through a few feet of insulated wire. The base will be magnetic so you can attach it to your oven and not worry about it until it starts to beep (the temperature you’ve set it to).
And that is it! The point here is that making a turkey a very manageable endeavor—and there’s no need to let the turkey intimidate you. I realize that I wrote an immensely long post on something I claim to be simple. I wanted this post to be thorough and cover a lot of ground on some potential questions that might arise from reading this. It was actually rather tricky to pull together—I kept feeling like I was skipping over important details. If there’s anything that I left unclear, please post a question in the comment section, and I’ll get right on it.
I hope that you all have a delicious, relaxing, and wonderful Thanksgiving. And I hope that if you’ve been previously afraid of roasting that turkey, that your fear is now long gone and in the past.
Thanksgiving Turkey
Method adapted from Alton Brown
1 turkey (weight depends on how many people are coming to your dinner; mine was about 12 pounds; allow for 3/4 pound per person – or more if you, like me, love turkey leftovers)
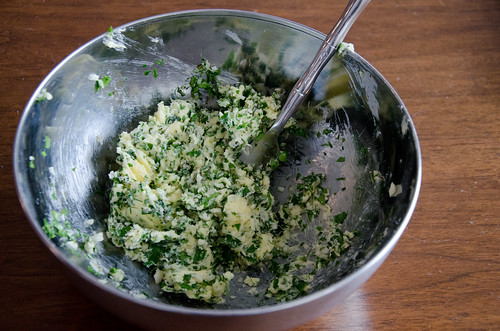
1 stick (8 tablespoons; 113 grams) unsalted butter, at room temperature
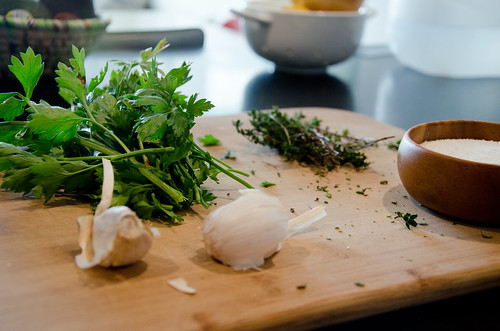
2 tablespoons finely chopped fresh thyme
2 tablespoons finely chopped fresh parsley (or you can use fresh sage instead)
1 tablespoon kosher salt
1 teaspoon freshly ground black pepper
4 cloves garlic: 2 finely chopped, and 2 smashed and peeled
2 sprigs fresh thyme
6 sprigs fresh parsley (of 4 sprigs fresh sage)
4 shallots thinly sliced (or 1 medium onion)
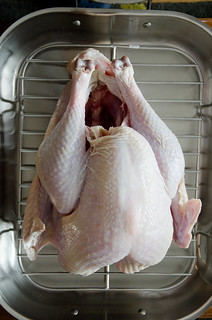
1. Let the turkey come to room temperature – this will take some time as it is quite a large bird. Give it a couple of hours at room temperature. Once the turkey is at room temperature, thoroughly pat it dry with paper towels, making sure to get in all the crevices, the internal cavity, under the wings, and where the drumsticks have a skin fold.
2. Position the rack in the lower third of the oven and heat the oven to 500 degrees F. Place bird on roasting rack in a roasting pan or a half-sheet baking pan. If you don’t have a roasting rack, make a “snake” out of foil (tear a long piece of foil and scrunch it up into a snake-like tube) and make a flat spiral out of it—there, you just make your own makeshift roasting rack.
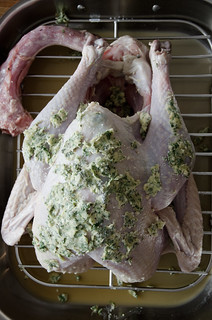
3. In a medium bowl, combine the butter, thyme, parsley, salt, pepper, and the finely chopped garlic until all the ingredients are incorporated. Make sure the turkey is at room temperature and is dry before rubbing the turkey, all over with the herbed butter. You will want to lift the skin between the meat and the breast and deposit some butter in those pockets as well. If your turkey is not room temperature, rubbing the butter will cause two things (see picture): your butter will firm up, making it harder to rub into the turkey; and the turkey will start “perspiring” and getting wet which makes is impossible to grease.
If you keep kosher and butter is a no-go for you, rub the turkey with a neutral oil that can withstand high temperatures—grapeseed oil is ideal here. Proceed with seasoning your turkey accordingly with salt and pepper (forget the herbs since it’s harder to rub them on the turkey with the oil). Also, if you’re using a kosher turkey, you might want to decrease the amount of salt you use on the turkey since it already comes pre-seasoned.
4. Once the butter (or oil) has been rubbed all over the turkey, add the shallots, sprigs of herbs and smashed garlic to the internal cavity. Grease a large folded piece of heavy-duty foil (it should look like an isosceles triangle) and place it over the breast, greased side down, with the long pointy corner pointing towards the opening of the turkey, over the breast and tuck the other corners under the wings. You basically want to “mold” the foil triangle to the breast place. Remove the triangle and set it aside.
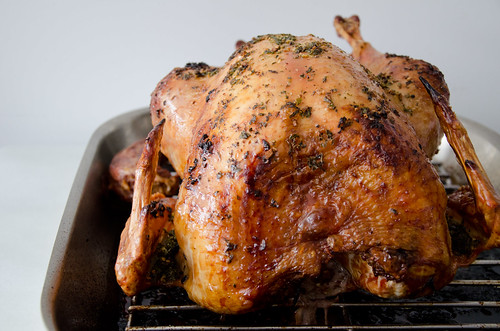
5. Roast the turkey for 30 minutes at 500 degrees F. By the time you pull the turkey out, it should be getting some nice, crisp, brown skin.
6. Cover breast with the premade breastplate, insert probe thermometer into thickest part of the breast and return to the oven, reducing temperature to 350 degrees F. Set thermometer alarm to 161 degrees. A 14 to 16 pound bird should require a total of 2 to 2 1/2 hours of roasting. [The bird for this post was about 14 pounds and took about 2 hours.] Once the turkey is done, remove it from the oven, cover it with a dome of heavy-duty foil, and let it rest for 30 minutes before carving, which gives you ample time to make the dressing and pop open that celebratory bottle of wine.
Turkey Brine:
2 quarts warm water
1/2 cup sugar
2 1/2 cups Diamond Crystal kosher salt
8 pounds ice
16 cups broth (your choice what kind)
In a clean, 5-gallon cooler, stir together the water, sugar, and salt until both are dissolved. Add the ice and the broth. Immerse the turkey (neck and giblets removed) in the brine bath, breast side up. If the turkey tries to float, put a weight on it – I find that a gallon resealable bag filled with water works wonders. Place a thermometer in the cooler – and make sure the temperature stays at 40 degrees F. If, at any point during the brining process, the temperature gets close to that number, add a few cooler packs. Close the cooler lid, and let the turkey brine for 8 to 10 hours, flipping it over once.
Alison Santighian
I desperately want to turn to you and Alton. but my Romanian MIL has a way she cooks the turkey and, despite my own cooking skills and the logic of thus method, i feel like i have to follow. Seriously. she just mentioned it yesterday on the phone. Sigh. But I’m going to be a rebel. maybe.
Alison Santighian
Omg. That should be “method.” Auto correct just made me the least PC person ever
olga
Alison – sometimes you just have to give up control. Every year, I try to stage an insurrection with pies (and every year, I’m thwarted). :)
lia
i am having trouble visualizing the tinfoil triangle. do you have a picture?
olga
Lia – yes, I linked to it in the recipe, but here is the pic.
Kira
Thank you so much for this post! I’m cooking a turkey for my family for the first time this year and this made the whole thing seems way less intimidating :)
Sarah
Many thanks for this wonderful post. I’m a student away from home this year, so would really love to host dinner for some friends. This made the turkey endeavor seem a lot easier!
Kathryn
Thanks so much for this recipe. I am in the process of making this right now, for a test run prior to my first Thanksgiving hosting this week. The bird is in the oven for the 500 degree portion, and it is creating a TON of smoke. Is this normal and if not, how I can avoid freaking out my family on the big day?
olga
Kathryn – some ovens are very sensitive and yes, some smoke is created. Unfortunately, the way to get your skin nicely crisped up is a high degree blast of heat. I’d open some windows in the meantime and turn a fan on (that’s what I do) – it’s only for 30 minutes so it’s not bound to be lasting. I also warn my guests that there might be a smoke magic show ;)
Carol Sacks
Terrific post, Olga. Like you, I LOVE the science of cooking and this was incredibly informative. Hope you and yours enjoy the holiday!
Allison
Thanks for the post! This really helps with my turkey-cooking anxiety! One question though. If you season the turkey with salt two days before, do you also add the tablespoon of salt in the Alton Brown recipe? I don’t want to accidentally over-season the turkey.
Also, I can’t wait to try your almond cake from a few posts ago. It looks amazing :)
Regina
i’m making my first turkey this year and i can’t thank you enough for this post. my only question is the same as allison’s above. after brining the turkey, how do i ensure that the amount of salt i add before sticking it in the oven is not too much?
thanks! happy thanksgiving!
Lynne
Olga,
Thank you for wonderful ideas. I agree with brining a turkey– big difference in flavor and moistness.
We have a 12-pound organic turkey. I was considering splaying my turkey this year, if that’s the right word–cutting out the backbone and flattening the bird. Then I thought why not go a step further and take the legs off so I can roast dark and white for just the right time….I’m undecided; I think I’ll sleep on it!
My struggle with the Alton technique is this: If I pull the turkey out when the white meat is 161 degrees, will not that temperature continue to rise, so that the final temp is closer to 171 by the time the turkey is finished resting? The theory may be that the dark meat will be at a higher temp than the white, since it is not protected with foil. If the dark meat is 170 when the breast meat is 161, then the dark meat will reach about 180 and be perfect, but I’m still worried about the white meat. I have had too many years when I am carving the legs off the turkey the juice is red, or the breast meat is really dry! Usually the former. Either situation requires hostess finesse, an extra glass of wine and a sense of humor! Fingers crossed this year. Happy thanksgiving to all
olga
Allison and Regina – no need to salt more, I don’t think. Sorry if I made things confusing.
Kris
Thanks to you, my first (time ever!) turkey came out fabulously! I stumbled upon your Turkey 101 post, followed your suggestions, and our turkey was magnificent. I am so thankful for you! Thank you, thank you!
Beth (OMG! Yummy)
Olga – used the dry brine method with a mixture I saw on LATimesFood w Russ Parsons then cooked it your way/Alton’s way. it came out perfect and we were told by all at the table that it was the best turkey they have ever had. Just nibbled on it and the white meat is still moist today – fantastic!
I definitely will stick with dry brining – easier than the wet with equally terrific results.
olga
Beth – both are great methods, dry and wet! And I’m glad the turkey worked out great – hooray, a TG success!
Rachel @ yourtablecloth.com
turkey 101 This looks absolutely amazing, and seems easy to make too! Yum.
ZAHIR
Thank you for this post. Photo makes my mouth watery. fantastic! I like your recipie and definetly will try it.
carrot coconut soup | Sassy Radish
[…] helpful (hopefully) Thanksgiving links: Pie crust primer Thanksgiving turkey 101 My favorite cranberry relish – no cooking required. Once again, going back to this stuffing […]
Connie Coultress
I need help, I have been cooking Butter Ball turkey at 3.25 degrees for about 6 hours and the thermometor is at 171 and it is brown, but it is still hard. What do I do?
olga
Connie – sorry to respond late, but did you put your turkey in frozen? Where did the internal probe thermometer go into? 171 is a bit too cooked for turkey. Could it just have been a bad turkey?
Junell Erickson
I need to know NOW: do I rinse the brining salt off the turkey before preparing to roast?