pie crust primer
Of all the things in the world, there are only a handful I’m pretty sure of: my husband being an amazing and kind person; gravity; good bread and butter as significant factors in my level of happiness; my morning runs making me a saner, smarter, healthier person. Another thing I’m pretty sure of is that the world doesn’t need another pie crust recipe. And I’m happy to say – this isn’t one. The recipe included here is one that you will probably see in countless magazine issues, blog posts, and newspaper articles. If they promise you of pie crust nirvana, I wouldn’t buy it. Not because the recipe won’t provide it, but chances are, if you look at the crust recipe already in your possession, either you have it already, or it’s pretty close to what is being offered. After all, there are only so many ways you can reinvent the wheel.
There seems to be, however, a proper lack of comfort level of how to make pie crust work with you and for you. The pie crust is generally thought of as “too much work”, as “finicky”, as “unpredictable”. While this here now might be the high pie baking time (what with all this amazing in-season fruit just begging to be pie-d (I just made it into a verb!), but because so many of us are enduring a merciless heat wave, it is precisely the high temperatures that not only seemingly threaten our pie crust success, but also deter you from setting foot in your kitchen never mind turning on your oven. And yet, pie must be made, I think. And I’m here to help you do it.
The reason I’m writing this post now, is that I’ve been getting a lot of questions from readers (on twitter, facebook, and emailed directly to me) not so much about the best pie crust recipe, but how to make the flakiest and most delicious onel how to take the fear of pie crust making out of the equation; how to logistically get it done because it seems quite insurmountable; how to make sure the dough wasn’t overworked. I sensed there was a lot of crust anxiety – and I wanted to help.
To make pie crust manageable, especially on a busy schedule, I recommend making the crust the night before you plan on making the pie. You’ll be amazed at how quickly everything comes together and how easy it seems. Psychologically, you’ll feel better too, breaking up a seemingly intimidating task into bite-size pieces.
So those reasons aside, I wanted to also set the record straight on how I, personally, avoid overworking the dough (step 4) and, for me, that all has to do with the size of the pieces of butter. In my opinion, most recipes will tell you to get the butter pieces too small – and in the past, has caused me to overwork my dough by a bit. Now, you can still make great pie crust having overworked it – I’ve done it; it’s not the end of the world. But — I think that it’s always better to adopt better practices, and the one I recommend below (one I picked up from the wise and amazing Melissa Clark) has served me better than any other pie advice out there.
I hope this primer helps. I know there are some excellent ones out there written by some wonderful folks. Hopefully adding my voice to theirs will help you all even more in realizing that making pie crust is kind of a piece of cake. (Okay, that was a terrible pun; I’m going to go be quiet now.)
Pie Crust Primer
1. You can make crust by hand, or you can make it in a food processor. Depending on how many batches of crust I am working on, I alternate between the two. If I’m making one pie, then I just do it by hand – it means having fewer dishes to wash after I’m done, and I’m generally not a fan of washing the dishes, perhaps because I do it so much. If I’m making multiple batches, I stick to the food processor – it has more wattage than my forearms, and though I’m pretty strong for my size, the food processor is stronger. However, if you’re a pie crust novice, I strongly recommend that you do it by hand. Why? Because you will get a much better feeling for texture and wetness of the dough when you’re observing it first hand. Also, it’s much harder to overwork the dough when you see it in front of you, rather than when it’s in a food processor bowl behind a layer of plastic.
2. Keep everything cold. The bowl, the pastry cutter, the knife (with which I cube the butter) – all go in the fridge before I make the crust. Sometimes, when it’s a very hot day, I measure out my dry ingredients and stick the bowl, with the dry ingredients, in the freezer for 5 to 10 minutes. It makes a difference. When I cube the butter, I put it on a pre-chilled plate and place the butter in the freezer for about 5 minutes to firm up again.
3. Butter vs. shortening vs. leaf lard. Look, I’ve eaten many a pie in my day and there are folks who swear by shortening, folks who swear by leaf lard, and folks who swear by that vodka in your pie crust Cook’s Illustrated recipe. Me – I’m an all butter girl. And yes, I’ve tried all those other versions and aside from my general dislike of shortening, I think that if you can achieve crust perfection with a minimum of ingredients, you’re in better shape. To me, an all butter crust just tastes the best. It also makes it easy for me to serve pie to my friends and family who don’t eat pork.
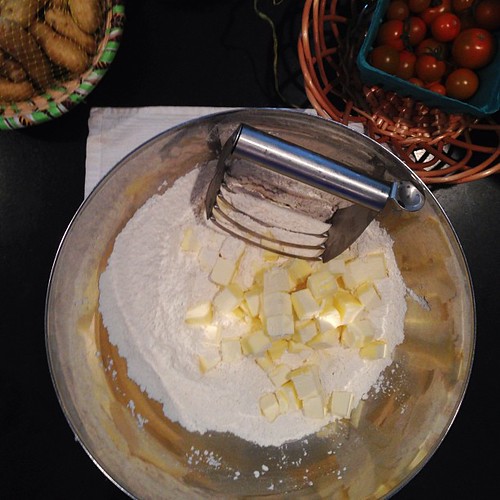
4. Visible pieces of butter. While I wouldn’t say this is the most important point, this is the most important point to read for most people who feel like making their own pie crust has been a frustrating experience. You’ll see many recipes and instructions on how you’re supposed to see pieces of butter in your pie dough. Visible butter = flakiness. The pieces of butter create little steam vents in the oven as the moisture evaporates from the butter, creating small air pockets, which in turn, give you flaky crust that shatters lightly when you bit into it or break it off with your fork. If you don’t see the flakes of butter in your dough while you’re rolling it out, chances are you’ve overworked the dough. Not all is lost, you can still make decent pie with it, but for the crust that dreams are made of, aim for small pieces of butter. The trick, really, is how to get there? And this is where my primer will differ from the rest. Most instructions/recipes/blog posts will tell you to incorporate your pieces of butter with your dry ingredients until the butter is the size of peas. But I am going to recommend that you work your butter in only until it is broken into pieces the size of lima beans or slightly larger. Keep in mind, your butter will be in different size pieces (it is virtually impossible to get them to be all the same size), but you’re aiming for 3/4 of the butter pieces to be the size of lima beans or slightly larger. How big is a lima bean, you might wonder? I’d say it’s about the size of 2 to 3 peas. You will then drizzle in your ice water and incorporate it into your dough, at which point, those larger pieces of butter will become smaller, pea-sized, which is what you want when you chill your dough. If you’re starting with pea-sized butter pieces BEFORE you add the water, then your butter will pretty much be fully incorporated into your dough by the time you’re ready to chill it.
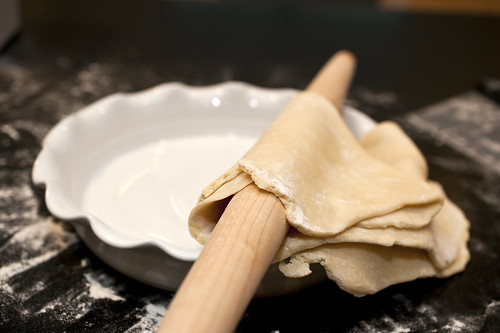
5. Flouring the counter, flipping the dough, rotating the dough. Okay, so you made you pie crust, you chilled it, and now you’re ready to roll it out. You’ve been told you have to work fast, so now you’re nervous: the pie crust is somewhat hard, not that rollable, and your counter is sticky. But you’ve also been told that you can overflour the counter and your dough and make it dry and cardboard-like — so naturally you are nervous about the whole process. Here’s how I recommend you do this. Place the disk of dough on a lightly floured counter. Sprinkle some flour on top of the dough and rub the flour into your dough as if dusting it. For the ladies, I like to use the analogy of powdering your face: you want to dust just enough to create a thin layer so you look polished, but not so much as you look like you’ve escaped an Elizabethan-era ball. Roll your rolling pin back and forth, starting out in the center and moving to the edge. Rotate the dough 90 degrees. Repeat with the rolling. Repeat with the rotating. Take a look at the dough on the bottom. If it’s sticking, use a bench scraper to unstick it from the counter and flip it so the bottom becomes a top. Powder the crust with some flour and continue to roll and rotate, flipping the dough over after 3 or 4 rotations. As your dough circle (or amoeba) starts to get bigger, you will need to use the pasty scraper to unstick it from the counter. Keep the counter lightly floured. Also, remember to roll the dough out from the center to the outer edge. Keep doing all this until you have a blob large enough that you think a pie dish will be more than enough for. Place the pie dish on top (or better yet, hover the pie dish over the dough) and see if there are at least 2 to 3 inches extra area around. If the answer is yes, then you’re ready to transport the dough to the pie dish. [If, at any point, you feel like the dough is becoming too soft and warm, just stick it in the fridge for a few minutes to cool off. While you wait, have some cold water to drink – it’ll cool you off too.]
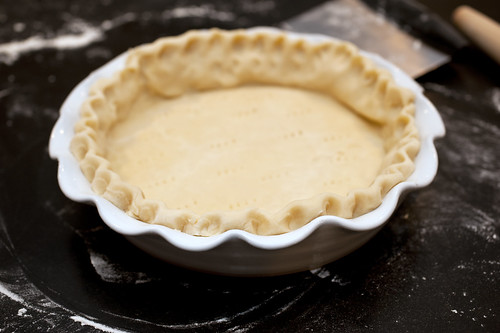
6. Transporting the dough to the pie dish. My favorite way is to just drape it, so it hangs, over my rolling pin, and gently place it over the pie dish, then using my hands to fit the dough just so there’s an overhang which I can trim, tuck, fold, what have you. Place a piece of plastic wrap over the pie dough, and refrigerate for 30 minute to 1 hour before blind baking. If you don’t chill, even with pie weights, you run the risk of shrinking your bottom crust – which isn’t the end of the world, but if you have a lot of fruit in the pie, might cause the pie to leak when you bake it with the filling the second time.
7. To blind bake or not to blind bake. Here’s how I look at this: You just spent time and effort making pie dough. You’ve chilled it. You’ve rolled it out. You’ve transported it to the pie dish. And now, the fate of this pie rests in your hands. Soggy bottom crust or crispy, flaky bottom crust? For my money (and my effort) I’d rather make my pie making process a teensy bit more complicated but wind up with the kind of pie where your guests proclaim, “This crust!! This crust!!” and upon this proclamation fall into the happiest of pie comas that can only be induced by the most amazing crust. So my recommendation, especially in the summer, especially when it comes to really wet, juice-producing fruit, is to blind bake, and blind bake like you mean it.
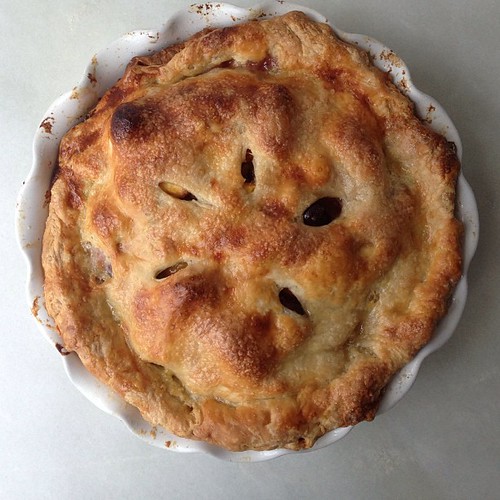
8. Once you blind bake, cool your bottom pie crust and prepare the pie filling. You can roll out the top pie crust (like a boss – because now you’re a pro!) and either use the whole crust (remember to cut some vents), or make lattice or decorative circles, and place them on top of the pie. Don’t forget the egg wash and a tiny sprinkling of sugar – so your pie looks glossy, shimmery, and all-over gorgeous to match its gorgeous and delicious interior.
9. Very important – let your pie cool before you cut it. Why? Yes, warm pie is delicious, you’re absolutely right, but if your pie is filled with the kind of oozy fruit you want to fill your pie with this summer, trying to cut and serve your pie while it’s still warm might not work out for you so well and you might be serving deconstructed pie to your guests. Now, that might not be even in the slight bit important to you, but in case it is, just remember to let the pie cool. Presentation can be important.
And that, I think, is it. Did I answer all the pie questions? Did I miss anything out? If you still have questions that I haven’t addressed, please add a comment below and I’ll answer/amend this primer as time progresses.
All-Butter, Flaky Pie Crust
2 sticks (1 cup; 8 ounces; 226 grams) unsalted butter
2 1/2 cups (315 grams) all-purpose flour
1 tablespoon (12.5 grams) granlated sugar
1/2 teaspoon kosher salt
1/2 cup ice water, plus additional as needed (you might need up to ¼ cup additional)
1. Dice the butter and refrigerate it for 5 to 10 minutes to firm up. In a large, wide (preferably chilled) bowl, whisk together the flour, sugar, and salt. Add the butter and, using your pastry blender, start working the butter into the flour mixture, cutting the butter into the flour and scooping the flour over. When your butter pieces, for the most part, are the size of lima beans (some will be the size of peas), stop working the butter into the flour. [If using a food processor, pulse the butter a few times until the pieces are the size of lima beans.]
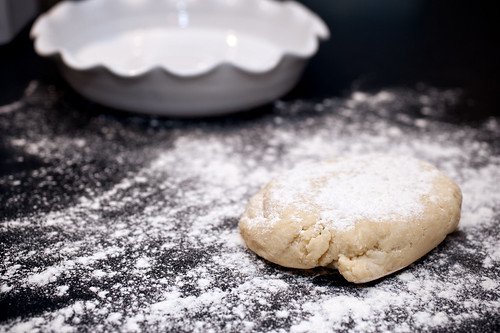
2. Drizzle the ice water into the mix (make sure to omit the ice cubes), and using a spatula, start to gather the dough together. If you need additional water (you might add another ¼ cup), add it 1 tablespoon at a time, mixing and gathering the dough. Once the dough starts to come together in large clumps, using your hands, gather the dough together, and start kneading it gently into a uniform ball. Knead a few times until the ball of dough comes together as if it’s always meant to be that way. Make a ball out of the dough, divide it in half, and flatten each half into an even disk. Wrap each disk in plastic wrap and refrigerate, for at least 1 hour (I like to let it rest overnight) and up to 3 days, before using. You can also freeze the dough, but be sure to let it rest in the refrigerator for 24 hours before using. [If using a food processor to make the dough, drizzle the water in and pulse a few times until the dough starts to come together. Dump the dough into a bowl and knead it a few times to that the dough is in a uniform ball with pieces of butter still visible.]
Makes enough for 1 2-crust pie.
Dana
That’s a well put together primer on pie crust!
I agree wholeheartedly about the butter. It just tastes better than the other options.
gluttonforlife
You may have saved my bacon, er piecrust. The rolling is where I always fall apart. And the crust does, too. Thanks for the tips!
Sarah
This reads like an extended love letter to pie crust! And now, all I want is pie!
Sharmila
Loved this. Loved reading every word of it! Even though I think I make decent pie crust, I can only see your directions have me make superlative pie crust. So wonderfully broken down.
You rule!
Ashley
I love some of your phrasing in the primer – rolling out your crust/amoeba (yay!) and inducing the “this crust!!!” coma…. You say it so well! And so helpfully! I want to make a pie right now.
Maria Tadic
This is such a helpful post. I’m always look for a “good” recipe, but you’re right, totally about technique. And most recipes leave all that stuff out! Now making a pie from scratch seems really easy for some reason! I can’t wait to try it again with some of your “rules” I know it’ll be better!
auntie lenie
I consider myself a dang good pie maker and have experienced my friends in a pie coma saying “this crust!” and I agree 100% with your primer. I even use the exact recipe, though I admit I always try to talk myself out of blind baking…
Michael
Found your site looking for a better pie dough recipe, glad I did. Your post was a big help for me. I plan to try your recipe this week.
Printed your recipe, thank you!
My real hobby is woodworking, you might be interested in my rolling pins or cutting boards.
thanks again,
Michael
Rolling Pins
Father’s Day At Our New Home - Apples Under My Bed - A food diary.
[…] Early yesterday morning I began the food preparation and I didn’t stop, really, until family arrived. It was glorious. Burning eggplant (intentionally), pureeing beets, chopping herbs… and my favourite activity of them all, making a pie crust. With my most loved soundtrack playing in the background, I worked to keep it cold – always, colder, more cold, there you go, chill it again, great job, keep it cold – for flaky, all-butter pie crust perfection. […]
ZAHIR
I like the way u showed us every single thing and step in photos. It’s just great! It makes very easy for the viewer and can understand easily. Your photos describes every thing. Thank you a lot!
carrot coconut soup | Sassy Radish
[…] helpful (hopefully) Thanksgiving links: Pie crust primer Thanksgiving turkey 101 My favorite cranberry relish – no cooking required. Once again, going […]
Today we’re going to make a pie - Apples Under My Bed - A food diary.
[…] 6. Sassy Radish and Melissa Clark have excellent tips on making and rolling out your pie dough. Pay attention to the rolling out part in particular, it changed my life. Wait, my pie life. No wait, my life. […]
gamis syar'i
Linen is made from the stack of the flax plant and has long lasting
fibres. Your choice of clothing from the style,
brand, cut and price eventually depends upon your personality, resources, and the insight for fashion and style.
These blazers can be very much suitable both as normal sized wearing and also as plus
size clothing. Like the big bird, you could stick your head in the proverbial sand, say nothing and hope for the best.
深圳媒体公关
10月20日,丰台区珠江峰景小区业委会成员前往丰台区房管局询问住宅专项维修资金被支出一事。 维修单位红太阳公司出具的退款承诺函。新京报讯 近日,丰台区珠江峰景小区业主发现,今年5月7日,该小区有一笔430余万的住宅专项维修资金被支出,用于消防系统大修。然而,物业公司称,从未向丰台区房管局申请过,材料上的签字和盖章系被伪造。对此,丰台区房管局房屋安全和设备管理科副科长赵新星表示,申报材料是否被伪造尚难定论。该局正收集材料,将视情况决定是否将此事件移交司法机关。业主查询维修资金生疑住宅专项维修资金,是住宅共用部位、共用设施设备的保修期满后的维修和更新、改造专用资金,不得挪用。近日,听闻有小区出现住